Although the list about available internet browsers for mobile devices is very big, there are only 3 or 4 browsers out of them used most widely. UC browser resides in the widely used mobile internet browser category. Community loves UC browser for its simplicity & surfing speed. If we talk about the UC browser, this mobile browser is developed by a Chinese company named UCWeb and is owned by the famous “Alibaba” of China. UC browser has been launched in April 2004 and day by day this browser is catching the new heights. UC browser is available for most of the mobile platforms, which includes Andoid, Windows Phone, iOS, Java ME, Symbian and BlackBerry. By implementing some UC browser tricks and tips, you can even take out some more performance of it.

Today, we are here to share Top 10 UC Browser Tricks & Tips with the internet community. These UC Browser Tricks & Tips will be applicable to all the mobile platforms. To demonstrate the UC Browser Tricks & Tips we are using an Android Phone / Device. Below is the step by step how-to tutorial, to boost the performance of UC browser.
1- Remove previous browsing data to Boost UC browser speed.
Everybody surf large number of websites daily, only some of them we open frequently. We are also aware that the previous browsing data stored is mainly responsible to boost the surfing speed at the time, when we visit the same website again. As the large part of the stored browsing data is useless, the best option is to delete it on the regular basic. Believe or not, people avoiding this UC browser trick always experience low browser performance. You will surely feel the difference, once you have performed this action in the UC browser. In addition, this act will free up some storage space in your device too. Below are the complete steps to perform this action.
1)- Open UC browser on your device and look for the “options menu” (3 horizontal lines at bottom-middle). Click to the option menu.

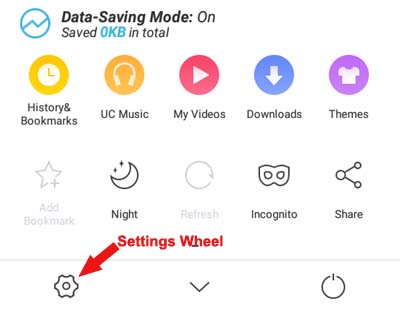
2)- After clicking the “options menu”, You will find the “settings wheel” at bottom-left of the screen. Click to the settings wheel.
3)- On the “Settings” screen, scroll down to “Clear Records” option & Tap/Click it.

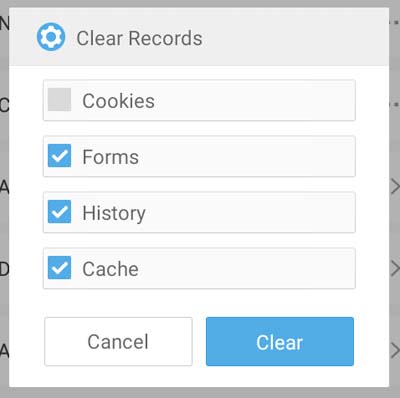
4)- Now you will be with the “Clear Records” popup window, make it sure that you have checked / ticked (Forms, History and Cache) options. Leave the Cookies option to the default (unchecked), as the Cookies doesn’t consume so much space plus they are useful in the future surfing. Hit the “Clear” button in the end.
That’s it, you have successfully removed previous browsing data to Boost UC browser speed. Enjoy fast browser performance plus the surfing speed.
2- Changing Font Size by activating Enable Force Zoom.
People uses the Internet mostly to grab or collect any specific needed information or data. Usually people surf the net to read any online books, study material, sample papers, tutorials etc, do you resides in the same group. If you belongs to the same group, you may have feel the need to change the font size while visiting any web page. Do you know, the health practitioners don’t recommend the people to read anything for the longer period, if that’s not clearly visible. Ignoring their precaution may give you any serious mental disorder including headache or weak eyesight. Keeping the same issue in the mind, UC browser has been bundled with the “Force Zoom” option. This feature will automatically adjust (zoom) the visited content on the UC browser, the user will always feel the true reading experience. Below are the simple steps to perform the needed action.
1)- Open UC browser, go to the “Setting Wheel”. (already demonstrated in UC browser Trick no 1).
2)- On the “Settings” screen, look for the “Font & Layout” option and click to it.
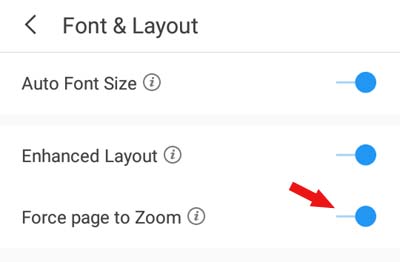
3)- On the “Font & Layout” screen, activate “Force page to Zoom” option by moving the slider button from left to right side.
That’s it, you have successfully enabled the “Force page to Zoom” features in UC browser, you really cares for your health.
3- Using the Text-Only feature of UC browser.
Can we ask you a question ?. What will you choose out of the appearance and the performance. Well you can submit your answers under the comments section below, but we know in advance that the answer for the same will depend on the circumstances. User on any slow data connection or with outdated device will always opt performance. On the other hand, user on any high speed data connection or up to date device will never cares for anything, they may give preference to the appearance over performance as they know they will get this performance factor by default.
As we all know, Websites / Web pages get designed by keeping the appearance factor in mind. For the same reason, text and images are transmitted into our device when we visit any website. As the text is more valuable than images, for the user at slow or metered data connect, why don’t we disable the image transmission. Yes, you got it right, this feature all about the same. Enabling “Text-Only” feature will disable the in coming images, which in return will boost the performance of the browser as well as the device. Below are the ways to enable this web page performance boosting feature.
1)- Open UC browser, go to the “Setting Wheel”. (already demonstrated in UC browser Trick no 1).
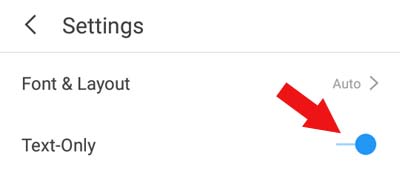
2)- On the “Settings” screen, look for the “Text-Only” option.
3)- Activate “Text-Only” option by moving the slider button from left to right side.
That’s it, you have successfully activated the “Text-Only” feature in UC browser. Feel the totally different experience while surfing any of your favourite website. If the “Text-only” feature is enabled, images will only appear if the user is using any WiFi data connection. On normal metered data connection, the pictures will never appear.
4- Minimize Image Quality.
This actually is the “b” version of the “Text-Only” feature explained above. We understand, in many circumstances the information isn’t complete without the inclusion of images. Under these circumstances, you can opt this feature to boost the performance and save the valuable metered data. Using this feature, the user will get good performance with average appearance. The best thing about “Image Quality” feature is that, the UC browser user never have to sacrifice much for the sake of performance. Below are the simple steps with demonstration to customize the Image Quality.
1)- Open UC browser, go to the “Setting Wheel”. (already demonstrated in UC browser Trick no 1).
2)- On the “Settings” screen, find the “Browsing Settings” option and click / tap to it.
3)- Once you get on to the “Browsing Settings” screen, look for the “Image Quality” option.
4)- Now, click / tap to the “Image Quality” option, you will see the pop up option window with actually 3 options (Low, Medium and High). Ignore the “Text-only” option on the popup window, it is just to activate the above explained Text-Only feature of UC browser.

5)- Select “Low” as your option to optimize the performance without effecting appearance.
That’s it, you have successfully customized the image quality for the UC browser. This will definitely improve browser performance without effecting the appearance.
5- Use Preload Page feature in UC browser to reduce page load time.
To explain the Preload Page feature of UC browser, can you allow us to take an example. Suppose you are performing any search on the Google search engine. Normally, the first result page opens with the links to other search result pages. You manually have to click each result page, and have to wait for the loading process get over for that result page. Can you imagine, if any intelligent service preload the next coming page in the background. Yups, you got it absolutely right, you people are intelligent people. This Preload Page feature in UC will load the next page in the background which will boost the loading time, when you actually visit the next web page. To enable this fantastic feature, follow the below procedure.
1)- Open UC browser, go to the “Setting Wheel”. (already demonstrated in UC browser Trick no 1).
2)- On the “Settings” screen, look for the “Preload Page” option and click / tap to it.
3)- Once you click the “Preload Page” option, a popup window with 3 options (Disable, Wap Pages and All Pages) will appear.
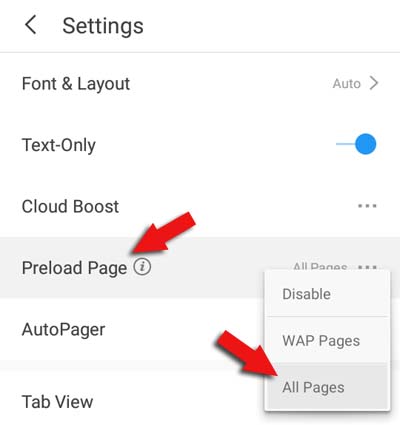
4)- Now, select the option “All Pages” from the popup window. This will enable the “Preload Page” feature for all pages.
Important: Once you opt to use the “Preload Page” feature for “All Pages”, the “AutoPager” option will get enabled of its own. For better understandings, the “AutoPager” feature will show you all the preloaded next pages in the background, on the same first page. See the picture below to understand the happenings more deeply. You can anytime disable this “AutoPager” feature and can use the normal “Preload Page” feature without “AutoPager” feature enabled.
Please Visit the NEXT Page for Top UC Browser Trick and Tips (6 to 10).