
Operating the mobile device using Android Operating system is always a great fun for everybody. Although, there are many inbuilt features inside the Android Operating system, people are just aware with 30% of them. In fact, it’s very very normal if you discover a new feature daily, out of this great mobile operating system. Now coming to the main point, Today we are here to discuss and share an unknown Android feature, Tethering & portable Hotspot. By using this Free WiFi Hotspot feature, you can easily share the internet data of your mobile device with others nearby wireless devices.
First of all, understand the meaning of Tethering & portable Hotspot. Technically, connecting any device with the other is known as Tethering, whereas portable refers to the smallest version of anything. Don’t worry, next is the meaning of the Hotspot, it refers to the place with tremendous activity. We hope, now you have understood it completely.
Now, you maybe wondering about the use of this Free WiFi Hotspot feature in the Android device. For easy understandings, just imagine if you are travelling somewhere and suddenly there is a urgent need to access the Internet on your Laptop, you also have forgotten to carry the USB dongle device with you. In this case, your mobile phone will be the only hope to fulfil your needs. Using this “Tethering & portable Hotspot” feature in your Android Phone, you can easily avail the Internet data to your Laptop. This WiFi Hotspot feature actually has many other benefits too, to share any single data connection among all the family members, to provide internet facility to any of the needful person. Beside all the positive benefits, it has a negative benefit too, it can also be used to steal the internet data of any of your friend or relative 🙂 , without putting to their knowledge. We hope, this Wifi Hotspot thing is now been much clear for everybody, let’s move to the next section, setting up the “Tethering & portable Hotspot” feature in the Android Phone / device.
Setting / Configuring the Free WiFi Hotspot feature in the Android Phone.
Important: We are using Android 5.0 (Lollipop version) to demonstrate the required steps to activate WiFi Hotspot in the Android device. Below are the complete easy steps to configure “Tethering & portable Hotspot” feature in the Android device.
1)- Go to Settings option of your Android Phone, TAP it to get inside.
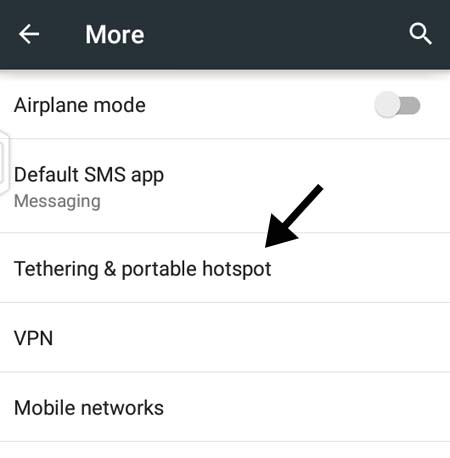
2)- Now, look for the “More” option under the “Wireless & networks” section. TAP it to get inside the “More” option.
3)- Now, you will be with “Tethering & portable hotspot” option. TAP to it.
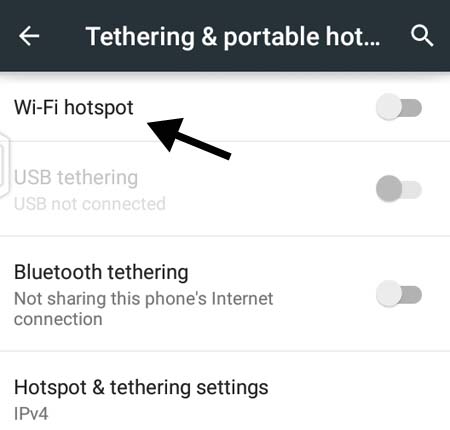
4)- Now, TAP to the option “WiFi Hotspot” and get inside.
5)- Once you get inside the WiFi Hotspot Window, Look for the “Set up WiFi hotspot” option and TAP to it.
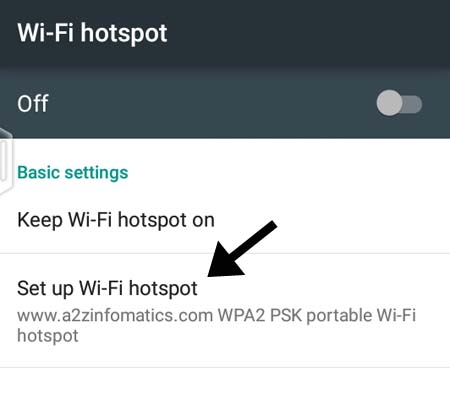
6)- Here, you will get a new popup Windows, asking you for the Network name, Security type and the password.
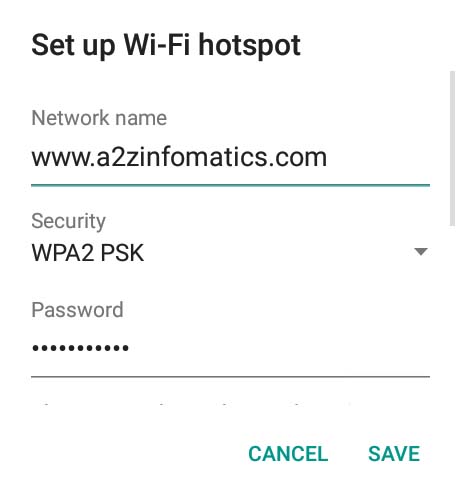
7)- Supply any desired information to the popup Window and hit the SAVE button.
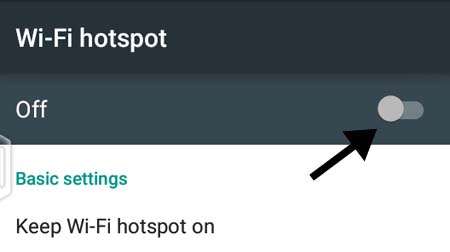
8)- To activate the WiFi Hotspot on the Android Phone, Just TAP to the “OFF” option at top-right.
Important: The Mobile Data has to be in ON position, while sharing the internet data in Android device, using the Free WiFi HotSpot feature.
Congo!, WiFi Hotspot is now active on your Android Device, anybody knowing the WiFi HotSpot password can easily connect to your WiFi Hotspot network. They just have to search for the available WiFi networks around them, and have to connect to it using the required credentials. Beside the above steps, there are some additional customize settings for the WiFi Hotspot in Android Phone, the same has been explained in detail below.
Custom Settings for the Android WiFi HotSpot (Tethering & portable Hotspot).
Here, using these custom settings, you can modify the functionality of the WiFi HotSpot completely. You can make it available for anonymous use, you can secure it by a password, you can set the maximum allowed connections and so on. All the customizations for the WiFi HopSpot can be done under the same Window, WiFi HotSpot. Below are the detailed information about all the customize setting for the Free WiFi HotSpot feature.
Keep Wi-Fi hotspot on.
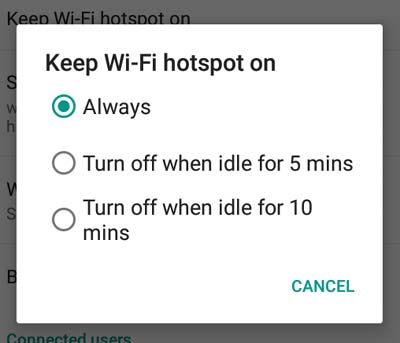
Under this, you will get 3 options for the choice, Always, Turn off when idle for 5 mins, Turn off when idle for 10 mins. By default it has been set up to “Always” on mode. As their name suggest, you can select any of the option, according to your needs. The second and the third option here, can be useful to save the battery life of your Android device.
Set up Wi-Fi hotspot.
Here you can change the Network name, security type and the password for the WiFi Hotspot. You can use any desired name for the WiFi network. In security setting, you can opt “open” for the anonymous use and WPA2 PSK for the secure (only with password) use. In the bottom, under Maximum connections, you can declare the maximum allowed connections for the WiFi HotSpot feature, the default setting is for 5 users and you can extend it up to the 8 users.
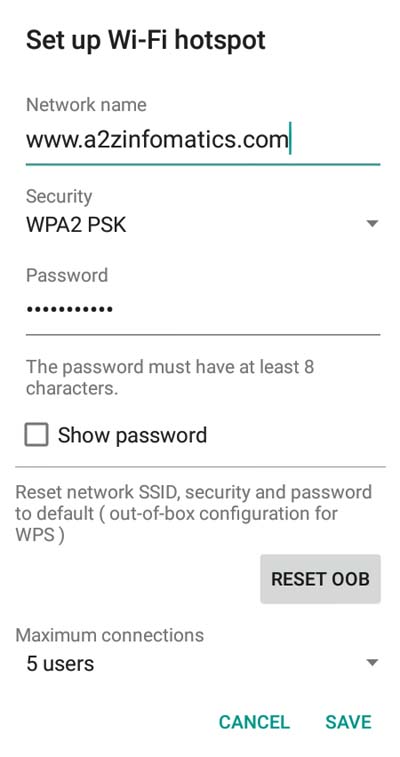
Important: The default security setting for the WiFi HotSpot feature is “OPEN” (anonymously accessible) always. Do make sure to select WPA2 PSK to avoid any data losses while using WiFi HotSpot feature in the Android Phone / Device.
WPS Connect.
Here, WPS represent “Wi-Fi Protected Setup”, It is mainly used to establish easier and faster connection between the router and the clients. In this case, the router in your Android Phone providing the WiFi HotSpot services and the clients are the wireless devices connected to the WiFi HotSpot service. Under this setting, you can select the WPS mode, push button or the PIN from client.
Bandwidth usage.
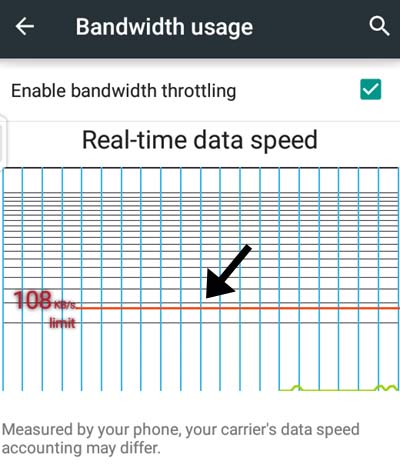
By customizing this additional setting, you can limit the connected users with a predefined data transfer rate. It is useful in the case, when the connected users to the WiFi HotSpot device are putting any extra load on the data connection. You just have to enable it by checking the “Enable bandwidth throttling” option and by adjusting the red horizontal line under the “Real-time data speed” option.
Discoverable.
You may find this option under the Wi-Fi HotSpot settings. This setting is basically to make the WiFi HotSpot visible or invisible for the others nearby devices.
Connected users.
It shows the current connected users to the WiFi Hotspot device. Using this additional setting, you can block any of user, putting any extra load on the data connection.
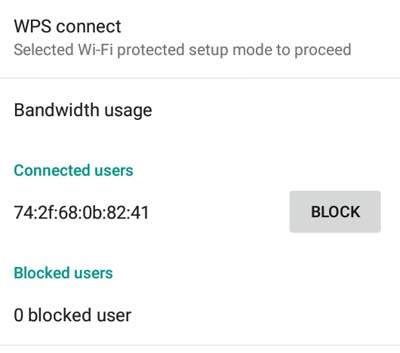
Blocked users.
Here you will find the list of all the previous blocked users. If you like, you can unblock any of them using this setting. To block any user again, you have to use the “connected users” setting above.
Final Notes.
Today, we have tried to explain each and every thing related to utilizing the Android Phone / Device as a Portable WiFi HotSpot. We hope, you have understood this completely and will utilize this great Free WiFi HotSpot feature in your daily routine as well as under urgent needs. That’s all we have related to the Portable WiFi HotSpot setup, we are signing off with lot of love and blessings for all the readers of this blog. Thanks for visiting, God Bless You, Always.


Will a vpn like from arcvpn provide me with extra security? I’m worried that my information will be stolen.